
Distributing Content to Another Ektron CMS400.NET Folder
Ektron CMS400.NET supports the distribution of Community Documents to any CMS folder. (A community document is either HTML content or an asset created via the Community Documents server control.)
For example, your Marketing Department uses the Community Documents server control to create and edit content. After completing a press release, they use the Distribute menu option to copy it from the private collaboration folder to a public content folder. Once there, the document can pass through an approval chain or be published immediately.
The Distribute option can insert new content or overwrite existing content in any folder.
Enabling the Distribute Option
Only a member of the Ektron CMS400.NET Administrators group can enable the Distribute option. Do this for every community group that will use it. You can do so from the Workarea or after logging in to the Web site.
From the Workarea
1. From the Ektron CMS400.NET Workarea, go to Settings > Community Management > Community Groups.
2. Click the group for which you want to enable the Distribute option.
3. Click Edit ( ) .
) .
4. Check the Enable Distribute check box.
5. Click Save ( ).
).
From the Web Site
1. Log in to a site that uses the Community Management features as a CMS administrator or a Group Administrator.
2. Navigate to a Web page that hosts a Group Profile page.
3. Click Edit Group (circled below).

4. Check the Enable Distribute check box.
5. Click Save ( ).
).
Distributing a Community Document
There are two procedures for distributing a community document. When doing so, ask yourself the following question.
|
What are you doing? |
Read this procedures |
|
Replacing an existing file in an Ektron CMS400.NET folder. The file types must match. |
|
|
Placing a file in an Ektron CMS400.NET folder for the first time |
Warning! After a community document is distributed the first time, the original document is forever linked to the destination document. You cannot break the link.
If you want to later revise the document, you would typically edit it in the collaboration folder and select the Distribute option again. When you do, you are asked to confirm replacing the document in the destination folder. You are not allowed to select another folder.
If you really must distribute it to another folder, delete the document in the destination folder. This action breaks the link between documents. Once the link is broken, you can distribute the document to another folder.
Distributing Content After the First Time explains how subsequent edits are handled.
Prerequisites
You log in as one of the following
- Administrator of the group whose documents are being distributed
- Ektron CMS400.NET user assigned Community Group Administrator role for that group
- CMS administrator
The content’s status is Approved.
You have permission to add, delete, and restore content to the destination folder. (If you do not, the folder doesn’t appear on the folder selection screen.) See Also: Folder Permissions
Distributing a New Community Document
When distributing a Community Document that does not exist in Ektron CMS400.NET for the first time, you identify a destination folder and, if required, metadata and taxonomy categories. This information is collected through a series of screens that guide you through the process.
Note: If you are using Ektron CMS400.NET with Microsoft Sharepoint Integration, after selecting the folder (in Step 8), the document is copied to that folder even if you later click the screen’s Close button. See Also: Distributing SharePoint Content to Ektron CMS400.NET Folders.
1. Log in to the Web site that contains content you want to distribute.
2. Navigate to the Web page that contains content you want to distribute.
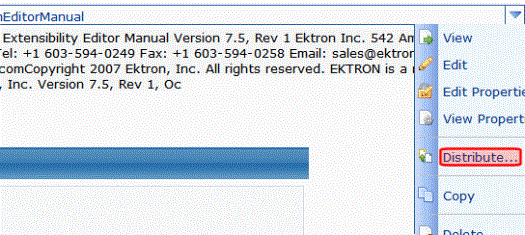
3. Click the triangle to the right of the content or asset you want to distribute.
4. Click Distribute from the dropdown menu.
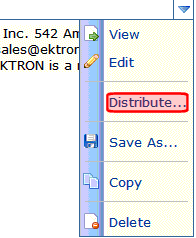
5. The following screen appears.
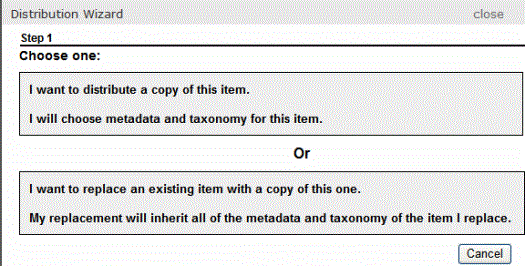
6. Click in the top box, which begins I want to distribute a copy of this item.
7. The following screen appears
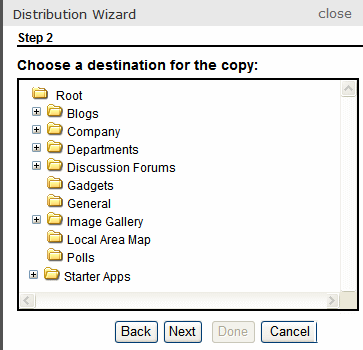
8. Select the folder to which you want to distribute the content.
9. Click Next.
10. The following screen appears if metadata or a taxonomy category is required for the folder.
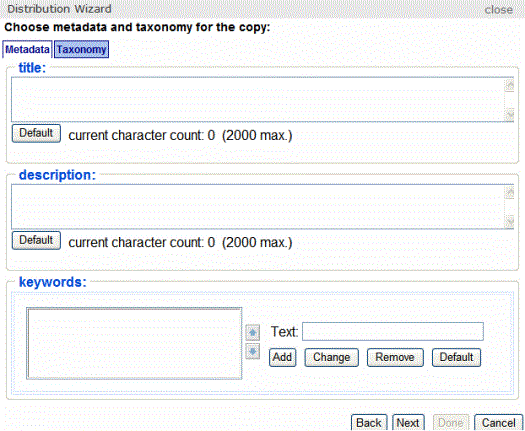
11. Enter any required metadata or taxonomy. See Also: Working with Metadata and TaxonomyTaxonomy
12. A confirmation screen appears. Click Done.
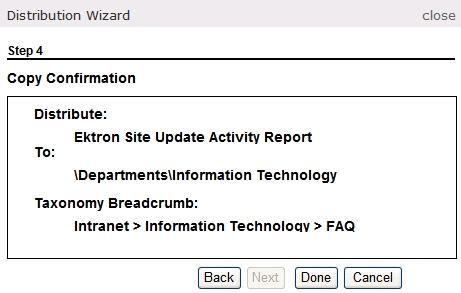
13. Ektron CMS400.NET copies the selected document to the designated folder.
Distributing a Community Document and Overwriting
Note: This process only occurs the first time you overwrite a document. For a description of subsequent updates, see Distributing Content After the First TimeDistributing Content After the First Time.
During this procedure, you identify a destination folder and content to be replaced. Since the content’s type that you are distributing must match the content being replaced, you only see content whose types match.
Upon replacing, any metadata and taxonomy categories applied to the existing content are applied to the new. Also, the content title and ID number from the existing content are maintained -- they are not replaced by the title and ID number of the new content. Finally, the existing content’s summary is maintained and can be edited if needed.
This information is collected through a series of screens that guide you through the process.
1. Log in to the Web site that contains the content you want to distribute.
2. Navigate to the page that contains that content.
3. Click the triangle to the right of the document you want to distribute.
4. Distribute appears on the dropdown menu.

5. Click Distribute.
6. The following screen appears.
Note: The following screen only appears the first time you overwrite a file. To overwrite the file subsequently, see Distributing Content After the First Time.

7. Click the lower box, which begins I want to replace an existing item.
8. The following screen appears.
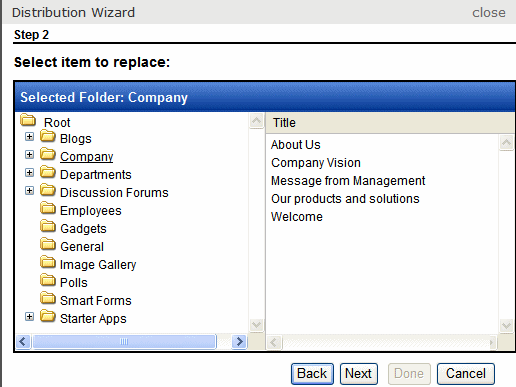
9. Navigate to and select the content you want to replace. Only content whose type matches the document you selected in Step 3 appears.
10. Press Next.
11. A confirmation screen appears. Click Done.
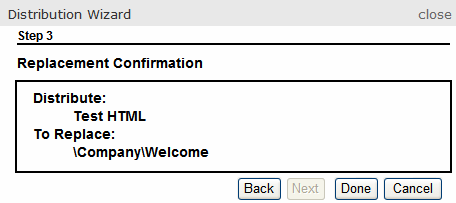
12. Ektron CMS400.NET overwrites the selected document with the one you selected in Step 3.
Distributing Content After the First Time
If you later try to Distribute the same document (whether you added a new document or overwrote an existing one), a screen like the following appears.
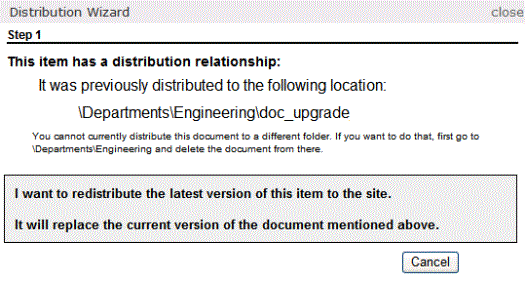
To copy the latest version of the document to the distribution folder, click the gray box whose text begins I want to redistribute... However, you cannot distribute the document to another folder. (If you want to do so, first delete the document from the destination folder. Then, you can use either procedure to distribute the document to any folder.)
When distributing content after the first time, its metadata and taxonomy categories appear on the Metadata/Category screen by default. You can change them if desired.
As with the replace option, the existing content’s title and ID number are maintained -- they are not replaced by the new content’s title and ID number. And, the existing content’s summary is maintained and can be edited if needed.


